Skip to content

Arlo Camera - FAQ

Frequently Asked Questions on Arlo Cameras

Arlo Cameras FAQ

This article applies to Arlo Pro 4, and Arlo Essential Wire-Free series cameras. For the best results, use the Arlo Secure app for Arlo camera setup.

To set up Arlo Pro 4 or Arlo Essential Wire-Free cameras:
  1. Launch the Arlo Secure app.
  2. Scroll down to the bottom of the screen and tap Add New Device.
  3. Tap Cameras.
  4. Tap Pro or Essential.
  5. Select your camera.
  6. Select Connect without SmartHub (or select an Arlo SmartHub or Arlo Base Station if desired).
  7. If you selected Connect without SmartHub, tap Continue.
  8. Check your mobile device settings to ensure you are connected to a 2.4 GHz network.
  9. Return to the Arlo Secure app and tap Continue.
  10. Enter your Wi-Fi SSID (network name) and password.
  11. Tap Continue.
  12. For Arlo Essential Wire-Free cameras:
    1. Press and hold the Sync button on the bottom of the camera for two seconds.
  13. For Arlo Pro 4:
    1. Insert the battery into the camera and tap Continue.
    2. When the LED on the front of the camera is blinking blue, tap Continue.
    3. If the LED is not blinking blue, tap LED is not blinking blue.
    4. Press and hold the Sync button on the inside of the camera and tap Continue.
    5. When the LED begins blinking blue, tap Continue.
  14. Hold the QR code about four to six inches in front of your Arlo camera.
  15. When you hear a chime, tap Continue.
  16. Arlo will begin looking for your camera.
    Note: Make sure the camera is within 3-to-6 feet of your Wi-Fi router during the setup process. Avoid placing the camera within proximity to other Wi-Fi devices to avoid signal interference during the setup process.
  17. Name your Arlo camera and tap Continue.
  18. Position your Arlo camera and tap Continue.
  19. Tap Finish.
Note: You must use the Arlo app to install your Arlo Essential Video Doorbell Wire-Free. However, you can read this article for an overview of the installation process.

To install your Arlo Essential Video Doorbell Wire-Free, you must have the following items:
  • The items that came in the box Note: These are listed on the quick start guide.
  • The Arlo app
  • A mobile device (smart phone or tablet)
  • A screwdriver
  • A power drill (Optional)
The Arlo Essential Video Doorbell Wire-Free installation process takes place in two phases:
  1. Connecting the doorbell to your Arlo account.
  2. Mounting the doorbell to your wall.
You must use the Arlo app to install your doorbell. These instructions provide a brief overview of the installation process.

To install your Arlo Essential Video Doorbell Wire-Free:
  1. Charge the battery that came with your Arlo Essential Video Doorbell Wire-Free.
  2. Connect your mobile device to your 2.4 GHz WiFi network.
  3. Use the QR code in the Arlo app to connect your Arlo Essential Video Doorbell Wire-Free to your 2.4 GHz WiFi network.
  4. Find a good place and position to install your doorbell.
  5. Mount your Arlo Essential Video Doorbell Wire-Free.
You are ready to operate your Arlo Essential Video Doorbell Wire-Free.
If you are connecting an Arlo camera directly to a Wi-Fi router—without an Arlo SmartHub or Base Station—you must connect your mobile device to your router’s 2.4 GHz band during the setup process. Many routers broadcast Wi-Fi networks in both 2.4 GHz and 5 GHz bands. Your Arlo device directly connects to a 2.4 GHz Wi-Fi network. This means that you must first connect your mobile device to your 2.4 GHz Wi-Fi network, then connect your Arlo device to that same 2.4 GHz Wi-Fi network during the setup process in the Arlo Secure app.

Note: The Arlo Video Doorbell, Pro 3 Floodlight Camera, Q, Q Plus, and Baby can connect directly to a 2.4 GHz Wi-Fi network.

Find your 2.4 GHz Wi-Fi network When connecting your mobile device and Arlo device to a Wi-Fi network, ensure that you select the SSID that indicates it is a 2.4 GHz network. This is typically indicated by a 2, 2.4, or 2G at the end of the SSID. If you have both 2.4 GHz and 5 GHz Wi-Fi networks:
  • Your 2.4 GHz network name or SSID might have a 2, 2.4, or 2G at the end.
  • Your 5 GHz network name or SSID might have a 5 or 5G at the end.
Arlo WiFi Some Wi-Fi routers have only one Wi-Fi network name that is used for both 2.4 GHz and 5 GHz Wi-Fi bands. If you’re having trouble connecting and your Wi-Fi network name doesn’t indicate whether it’s 2.4 GHz or 5 GHz then:

Connect to your 2.4 GHz network
To connect your iOS (Apple) device to a 2.4 GHz network:
  1. Unlock your device and open Settings.
  2. Tap Wi-Fi, near the top of the list of settings options.
  3. Turn on Wi-Fi by tapping the switch next to Wi-Fi at the top. Note: Wi-Fi is enabled when the Wi-Fi button is green.
  4. Select a 2.4 GHz Wi-Fi network. This is commonly indicated by a 2, 2.4, or 2G at the end of the network name or SSID.
  5. If prompted, enter the password for the network. When you are connected to the Wi-Fi network, a blue checkmark appears to the left of the network name.

To connect your Android device to a 2.4 GHz network:
  1. Unlock your device and tap the Settings app.
  2. Tap Network & Internet > Wi-Fi.
  3. Enable Wi-Fi by tapping Use Wi-Fi at the top.
  4. Select a 2.4 GHz Wi-Fi network. This is commonly indicated by a 2, 2.4, or 2G at the end of the network name or SSID.
  5. If prompted, enter the password for the network. When your device is connected to the Wi-Fi network, the word Connected appears under the network name.
For the best results use the Arlo Secure app for Arlo camera setup.

To set up the Arlo Pro 3 Floodlight Camera:
  1. Launch the Arlo Secure app.
  2. Scroll down to the bottom of the screen and tap Add New Device.
  3. Tap Lights.
  4. Tap Pro 3 Floodlight Camera.
  5. Review the Meet your Arlo Floodlight screens, watch the installation video, and tap Continue.
  6. Select Connect without SmartHub (or select an Arlo SmartHub or Arlo Base Station if desired).
  7. If you selected Connect without SmartHub, tap Continue.
  8. Check your mobile device settings to ensure you are connected to a 2.4 GHz network.
  9. Return to the Arlo Secure app and tap Continue.
  10. Enter your Wi-Fi SSID (network name) and password,
  11. Tap Continue.
  12. Insert the battery into the Arlo Floodlight and tap Continue.
  13. Keep the Arlo Floodlight separate from the housing and tap Continue.
  14. When the LED on the front of the Arlo Floodlight is blinking blue, tap Continue.
  15. Hold the QR code about four to six inches in front of your Arlo Floodlight Camera lens.
  16. When you hear a chime, tap Continue.
  17. Arlo will begin looking for your camera.
  18. After the camera is found, name your Arlo camera and tap Continue.
  19. Now that the Arlo Floodlight is paired with the Arlo Secure app, tap Continue to proceed with mounting the Arlo Floodlight.
  20. Place the Arlo Floodlight in an area with strong bandwidth and tap Continue.
  21. Make sure the Arlo Floodlight battery is charged and tap Continue.
  22. Review the screens for installing the wall plate, securing the housing, and adjusting the angle of the Arlo Floodlight, then click Continue.
  23. Check the position of your Arlo Floodlight and tap Continue.
  24. Follow the instructions for testing the light and tap Continue.
  25. Tap Finish.
To install and use your Arlo system, you must have a high-speed Internet connection and the minimum operated system required to use the Arlo Secure app or web portal. You can use the Arlo Secure app or web portal to access video footage from your Arlo cameras.

Connectivity requirements All Arlo cameras require a high-speed Internet connection, but each Arlo camera uses a different amount of bandwidth. Bandwidth use is measured on a per-camera basis. If you have multiple Arlo cameras on the same network, you can estimate the total bandwidth use of your entire Arlo system by adding the average bandwidth use of each camera. Your Arlo system requires the following:
  • A high-speed Internet connection to sustain the following average bandwidth use per camera:
    • Arlo Ultra Series: 3 Mbps upload per camera
    • Arlo Pro Series (Pro 3 and newer) and Essential Video Doorbells: 2 Mbps upload per camera
    • All other Arlo cameras: 1 Mbps upload per camera
  • An Internet router with an available Ethernet port if you are using an Arlo SmartHub or Base Station.
Arlo works with the minimum requirements, but the functionality and video quality might be negatively affected. With a lower upstream bandwidth, there is a greater possibility that video quality might be pixelated and unclear. You might also experience a delay in starting a live stream.

Arlo Secure app requirements To download the mobile app for your Apple or Android device, visit your device’s app store and search for Arlo.
  • Apple devices: For all future product and app enhancement updates, the Arlo app requires iOS version 11 or higher.
  • Android devices: For all future product and app enhancement updates, the Arlo app requires Android version 5.0 or higher.

Arlo web portal requirements The Arlo web portal requires the following:
  • A computer running macOS or Windows.
  • One of the following web browsers:
    • Chrome on Windows and macOS (latest version)
    • Firefox on Windows and macOS (latest version)
    • Safari on macOS (latest version)
    • Microsoft Edge on Windows (latest version)
Note: If you use the Arlo Secure app on an earlier OS version than these minimum versions, the Arlo Secure app might not function as expected.
If your Wi-Fi network name or SSID doesn’t indicate whether it’s 2.4 GHz or 5 GHz:
  • Try opening your router settings and look for a 2.4 GHz Wi-Fi network that your mobile device can connect to. If you need help with this, contact your router manufacturer.
  • Contact your Internet Service Provider (ISP), and ask for help connecting your mobile device to a 2.4 GHz Wi-Fi network.

If your router uses the same Wi-Fi network name or SSID for both 2.4 GHz and 5 GHz Wi-Fi bands:
  • Routers can use the same network name or SSID to broadcast both 2.4 GHz and 5 GHz Wi-Fi networks. If your mobile device is connected to a mesh network, your Arlo device will not be able to connect to the 5 GHz band, so it will automatically connect to the 2.4 GHz band.
    • For networks that have the same SSID for 2.4/5 GHz: Try temporarily disabling 5 GHz in the router settings.
    • For Mesh systems: If you are having difficulty connecting, try temporarily turning off the access points, and connect the camera to the main router first. Once installation is complete, power on the access points again.

If your Arlo device still isn’t found during setup:
  • Ensure that you entered the correct SSID and password in the Arlo Secure app during the setup process. Note: The SSID is case sensitive. Ensure that it is EXACTLY correct when you enter it in the Arlo Secure app.
  • Ensure that your mobile device is NOT connected to a VPN.
  • Ensure that “auto join” settings are turned off on your mobile device.
  • Ensure that Wi-Fi Assist and Adaptive Wi-Fi features are off on your mobile device. Wi-Fi Assist and Adaptive Wi-Fi features use cellular data when your Wi-Fi connection is poor. This can interfere with the Arlo device setup process.
If your Arlo camera or device was working before and now it is offline, follow these troubleshooting steps:

Is your Arlo device connected to the correct Wi-Fi network?

Is your router, Arlo SmartHub, or Arlo Base Station connected to the Internet?
  • Wi-Fi router:
    • If your router isn’t connected to the Internet, you can try unplugging your router, waiting 30 seconds, and plugging it back in.
    • If your router still does not connect to the Internet, contact your router manufacturer or internet service provider (ISP).
  • Arlo SmartHub or Arlo Base Station:
    • To see the Internet connection status, check the LED(s) on your Arlo SmartHub or Arlo Base Station.

Is your Arlo device in range of your Wi-Fi router, Arlo SmartHub, or Arlo Base Station?
  • For a Wi-Fi router, check with the router manufacturer for its range.
  • If you are using an Arlo SmartHub or Arlo Base Station, place your Arlo device within 300 feet (90 meters) of your Arlo SmartHub or Arlo Base Station.

Is there Wi-Fi signal interference?
  • Environments with multiple Wi-Fi networks, Wi-Fi devices, or frequencies can cause signal interference.
    • If possible, minimize the number of networks, Wi-Fi devices, and transmitted frequencies in the area where you place your camera.
    • For help with adjusting Wi-Fi settings such as the channel for your router, check the instructions that came with your router or contact your internet service provider (ISP) if they installed your router.
  • We also recommend that you place your camera at least 10 feet (3 meters) from your router or Arlo SmartHub or Arlo Base Station, if you use one.
    • Allow at least 6½ feet (2 meters) between each camera or Arlo camera to prevent Wi-Fi signals between the devices from interfering with each other.

Is your Arlo device receiving power?
  • If your Arlo device uses a battery, make sure the battery is charged (and properly inserted, if the battery is removeable).
    • The Arlo Secure app lets you know if your battery is low.
  • If your Arlo device is plugged in to an electrical outlet or solar panel charger, make sure that the connections are secure and that the outlet or solar panel is receiving power.
    • We recommend you only use Arlo cable accessories that are compatible with your Arlo product.
  • Avoid using third-party charging cables.

Turn your Arlo device off and on.
  • If your Arlo device uses a removeable battery, remove the battery for ten seconds, then reinsert the battery.
  • If you are using a wired device, unplug the power for ten seconds, then plug the device back in.

Is your camera too hot or too cold?
  • If your outdoor camera is too hot or cold, the Arlo Secure app displays a warning, and the camera shuts down temporarily until it reaches a safe operating temperature.

Perform a factory reset on your device.
  • If you tried all the above options, and the Arlo Secure app still shows that your device is offline, remove your device from the Arlo Secure app, factory reset the Arlo device, and reinstall it to your account
Camera Positioning Tips
  • Make sure that no objects are too close to your camera. If any objects (like walls, light fixtures, or eaves) are within 2.5 inches (6.4 cm) of the sides or front of your camera, they can cause glare or hazy video, especially at night.
  • Elevate your camera. Mount your Arlo camera at least 7 feet (2 meters) high and aim it slightly downward for the best sensor performance.
  • Aim your camera. Adjust the angle of your camera so that any motion you wish to detect appears in the lower part of the image.
    • If you want to detect motion closer to the camera, such as visitors to your front door, mount the camera at least 7 feet (2 meters) high and aim it so visitors will appear in the lower two-thirds of the image. This angle works well to avoid motion alerts for movement in the top third of the image, like vehicles driving by.
      Arlo Close Motion Detection
    • If you want to detect motion farther away, such as on a lawn, aim the camera higher to frame the area within the lower two-thirds of the image.
      Arlo Far Motion Detection
  • Aim with the cloud. Use your Arlo camera’s position mode to send video to the cloud as quickly as possible. This allows you to aim the camera while watching the video feed on your Arlo Secure app to make near real-time adjustments to the camera’s position.
  • Ensure that your camera isn’t looking through glass or other transparent objects. Your Arlo camera’s motion sensor decreases in performance when it is aimed to look through glass, plastic, or a mirror.
  • Keep active locations in the camera’s field of view. Position your camera so that the space that you want to monitor is within the camera’s field of view.
    Arlo Camera Field of View
  • Point your camera only at important areas. Arlo’s motion detection feature turns on each time the camera senses motion. If your camera is facing a very busy street, the camera’s AI activates each time a car passes by. This can drain the battery. You may need to adjust your field of view to point the camera away from the busy area. To learn more about battery life, visit: How can I extend my Arlo camera’s battery life? in the FAQ.
  • Ensure that side-to-side traffic crosses Arlo’s field of view. Arlo’s motion sensor is much more sensitive to side-to-side movement across its field of view than to movement directly toward or away from the camera.

Camera Placement Tips for Wi-Fi Signal Strength
  • Check your signal strength. In the Arlo Secure app, the number of bars in this icon ( ) shows the performance of your Wi-Fi signal. Make sure that your cameras have three or four bars of signal strength in the area that you want to place them. The cameras can work when signal strength is at one or two bars, but they might go out of range intermittently due to fluctuations in the environment.
  • Make sure your camera is within the range of your Wi-Fi router. If signal strength is poor, your Wi-Fi router might be too far away from your Arlo camera. If possible, try moving your camera closer to your router, or use a Wi-Fi extender or mesh network to improve your connectivity. Contact your ISP or router manufacturer for more information.
    • For mobile cameras like the Arlo Go series, choose an installation location with good mobile coverage.
  • Optimize the location of your Wi-Fi router, Base Station, or SmartHub. Signal range is reduced by each wall, ceiling, or other major obstruction between the camera and its Wi-Fi source. The following materials reduce signal strength the most:
    • Unusually thick walls and ceilings
    • Brick
    • Concrete
    • Stucco
    • Stone
    • Ceramic
    • Glass, especially mirrors
    • Metal
    • Large quantities of water, such as the water in a fish tank or water heater
  • Check your camera placement. Make sure your camera is at least 10 feet (3 meters) away from your Wi-Fi router, SmartHub, or Base Station, and at least 6.5 feet (2 meters) away from other Arlo devices.
  • Make sure that your home Wi-Fi and mobile device meet Arlo’s minimum requirements.
  • Check your SmartHub or Base Station placement. If your camera is connected to an Arlo SmartHub or Base Station, make sure it is within 300 feet (90 meters) of the SmartHub or Base Station. The maximum range of 300 feet is reduced by each wall, ceiling, or other major obstruction between the camera and SmartHub/Base Station.
The battery life of your Arlo camera varies depending on usage. The most common cause of battery drain is excessive usage and the best way to improve battery life is to reduce unwanted videos. Use the following tips to help reduce battery drain and maximize Arlo camera battery life.

Arlo Settings & Configuration Configure your camera to record shorter videos.
  • Battery-powered cameras are not intended for continuous recording.
Use the Optimized or Best Battery Life Power Management setting.
  • The Best Battery Life setting reduces video quality but improves battery life.
  • The Optimized setting balances battery life and video quality.
Set a schedule to activate and deactivate cameras automatically.
  • Schedules help to manage battery life by keeping cameras active only when desired.
Decrease Motion Sensitivity to improve battery life.
  • Excessive motion detection will drain your battery quickly.
Adjust the light settings for Spotlight cameras and Floodlights.
  • Increased light duration and brightness can reduce battery life.
Ensure your Arlo camera is running the latest firmware.
  • It is important to have the most current firmware installed for your Arlo device for optimal camera operation.
  • Firmware updates are typically automatic.
    • If your firmware has not been updated, you can complete the process manually.

Camera Positioning & Placement Only point your camera at important areas.
  • Arlo motion detection turns on when the camera senses motion.
  • For example, if your camera faces a very busy street, motion detection activates each time a car passes by.
    • This can drain the battery prematurely.
    • Adjust your field of view away from busy streets or active areas, focusing only on what’s important.
Position your camera within range of your Wi-Fi router, SmartHub, or Base Station.
  • If your camera is too far away from your Wi-Fi router, SmartHub, or Base Station, you will have poor signal strength, which can drain your camera battery more quickly.
Do not place your Arlo camera too close to Wi-Fi routers, SmartHubs, or Base Stations, or other Arlo devices.
  • Avoid placing cameras too close to other Wi-Fi devices to avoid interference, which can reduce battery life.
  • Make sure your camera is at least 3 feet (1 meter) away from your Wi-Fi router, SmartHub, or Base Station, and at least 6.5 feet (2 meters) away from other Arlo devices.
Place your camera in an area that gets enough light.
  • Dark environments will cause infrared sensors to work harder, which will reduce your camera’s battery life.
If possible, keep the camera in a location with temperatures above 32°F (0°C).
  • For your safety and to avoid permanent damage to the batteries, Arlo camera batteries do not charge at temperatures below freezing, even if your camera is plugged in.

Batteries, Charging Cables, Solar Panels, SmartHubs, and Base Stations If your Arlo device uses rechargeable batteries, only use the rechargeable batteries that came with your camera or replacement batteries from Arlo. Use the Arlo XL Rechargeable Battery & Housing to increase battery life for Arlo Ultra, Arlo Ultra 2, Arlo Pro 3, and Arlo Pro 4 cameras. Add a compatible Arlo Solar Panel to your camera to help keep the battery charged. Use outdoor charging cables to keep the battery charged.
Your Arlo camera batteries might report low power in cold weather because their internal chemical reactions slow at low temperatures. Because of the kinds of batteries they use, the minimum operating temperature for Arlo Wire-Free cameras is 14°F (-10°C), while the minimum operating temperature for Arlo Ultra, Pro 4, Pro 3, Pro 2, Pro, and Go cameras is -4°F (-20°C). The Arlo Solar Panel’s operating temperature range is 32° to 122°F (0° to 50°C). Note: For your safety and to avoid permanent damage to your batteries, your batteries do not charge at temperatures below freezing, even if your camera is plugged in. The Arlo Solar Panel also cannot charge your battery at temperatures below freezing.

Follow these tips to keep your batteries charged in cold weather:
  • If your camera stops charging because the battery is too cold, bring the camera to a location where the temperature is above freezing and plug it in. Your camera resumes charging as soon as the battery reaches a safe temperature.
  • If your cameras are in a location that routinely experiences temperatures below freezing, you might need to bring your cameras inside to charge more frequently than in warmer months. You can also use an Arlo Charging Station or Arlo Dual Charging Station to keep spare Arlo Ultra, Pro 4, Pro 3, Pro 2, Pro, or Go batteries charged.
  • If you use the Arlo Solar Panel, your solar panel might not be able to keep your camera fully charged on days that are cloudy, rainy, or otherwise don’t provide enough solar energy. Your Arlo solar panel might also be unable to keep your camera charged during periods of heavy use.
  • The total energy that an Arlo Solar Panel can produce depends on many external factors:temperature, shade, weather, and amount of dust or debris on its surface. If your solar panel is not keeping your battery charged, make sure that you clean off any accumulated dust or debris and that the solar panel is receiving enough sunlight.
  • If your camera’s battery level drops suddenly in cold weather, follow the troubleshooting steps below:

To troubleshoot low Arlo camera battery in cold weather:
  1. Return the camera to room temperature and power cycle the camera by opening and closing the battery door while the camera is not plugged in. After the camera is back online, check if the battery capacity notification is restored to normal.
  2. If your camera is still reporting low battery in cold weather, place your camera in a warmer location to see if the problem is duplicated in that setting.

Arlo App - FAQ

Frequently Asked Questions on the Arlo Secure App

Arlo App FAQ

With Arlo cameras, you can choose to receive email alerts and push notifications when motion or sound is detected on each camera that’s connected to your Base Station. You can also choose to send email alerts to someone else or to multiple people. To edit the notifications associated with a camera, you must edit the modes and rules for that camera.

To set up email alerts or push notifications:
  1. Launch the Arlo Secure app or log in to your Arlo account at my.arlo.com.
  2. Tap or click Mode and select the standalone camera or the Arlo SmartHub or Base Station for which you want to set up notifications.
  3. Tap or click the pencil icon next to the mode that you want to change. Inside the Edit Mode screen, the collection of rules that make up that mode displays.
  4. Tap or click the pencil icon next to the rule for which you want to set up notifications.
  5. Under Alert, select the check box next to Push Notification to receive push notifications on your mobile device.
  6. To receive email alerts, select the Email Alerts check box.
  7. If you selected Email Alerts, tap the pencil icon to enter the email addresses of the people who need to receive email alerts. Note: The email address that is associated with your Arlo account is already included.
  8. Tap or click Edit to enter additional email addresses.
  9. Tap or click Save. Your settings are saved.
Modes and rules let you tell your Arlo system what to do in different situations. Each mode uses one or more rules to control your Arlo system. For example, you can set your Arlo system to record a 30-second video when the motion sensor is activated on a specific camera and alert you via email.

How do Arlo Modes and Rules Work?
Arlo Modes Arlo modes give you control over how your cameras respond to motion or sound. Modes let you tell your Arlo cameras to respond differently at different times. For example, you probably don’t want to receive an alert about motion in the living room while you’re doing yoga there. You might want to turn on a different mode when you’re away on vacation than when you’re out at the store for an hour. You can create your own modes, but the Arlo Secure app comes with these modes:
  • Armed. Detection is on for this camera.
  • Disarmed. Detection is off for this camera.
  • Schedule. Manage detection based on a schedule.
  • Geofencing. You can arm, disarm, or resume a schedule mode when you arrive at, or leave, a given location based on your mobile device location.
You can customize the Armed and Schedule modes and you can add new modes. You might want to create a mode in which some motion sensors and cameras are active but others aren’t. For example, when you’re sleeping, you might want your exterior cameras to be active, but your interior cameras to be inactive.
Note: You can create different modes for the same camera, but the camera can only use one mode at a time
For each mode, you can set the rules following these options:
  • Trigger device. The trigger device is the camera that detects motion or sound. You can adjust the motion and sound sensitivity to minimize false alarms.
  • Trigger. Triggers can be motion detection, audio detection, or both. You can adjust the camera’s sensitivity to motion and sound to reduce false alarms. You can also specify up to three activity zones for your camera to monitor.
  • Devices. You must select the Arlo device that will do the action caused by the trigger that has been set.
  • Action. Each device that responds to motion or sound can record video, take a snapshot, or do nothing. You can adjust the length of the video recording from a minimum of ten seconds to a maximum of five minutes. If your camera includes an integrated siren or if you use an Arlo SmartHub or Base Station, you can turn on a siren in response to a trigger.
  • Notifications. When a trigger is detected, Arlo can send you push notifications, email alerts, or both. You can also send email alerts to friends, family members, pet sitters, or anyone who might need to respond when a camera is triggered.
  • Cross-triggering. You can use motion or audio triggers to cross-trigger to other devices on the same Arlo account. Cross-triggers that can be set up, include:
    • Camera can record
    • Camera can take a snapshot
    • Video doorbells can also record and take a snapshot
    • Cameras and Arlo SmartHubs or Base Stations with the feature available can activate siren
    • Chimes will play audio (play melody, simulate home presence, activate siren)
    • The light on Pro 3 Floodlight or Arlo Security Light can be activated

To edit existing modes or rules for an Arlo device:
  1. Launch the Arlo Secure app or log in to your Arlo account at my.arlo.com.
  2. Click or tap Mode.
  3. Click or tap the device whose mode you want to edit.
  4. Click or tap the pencil icon next to the mode or rule that you want to edit.
  5. Edit the mode or rule and tap Save.
  6. Tap Done.

To create custom modes and rules for your Arlo device:
  1. Launch the Arlo Secure app or log in to your Arlo account at my.arlo.com.
  2. Tap or click Mode.
  3. Tap or click the device for which you want to create a mode.
  4. Tap or click Add a Mode.
  5. Type a name for the mode and tap or click Next.
  6. Follow the prompts to set up your trigger, motion or audio detection, actions, recording settings, and notifications:
    • Trigger Device: Select the device you want to detect motion, sound, or both.
    • Trigger. Select the type of event that you want your Arlo device to monitor. Depending on the type of camera you own, this can be motion detection, audio detection, or both.
    • Motion Settings. Use the slider to set motion sensitivity for your trigger. The higher the motion sensitivity, the more likely the camera is to detect motion that is farther away from the camera.
    • Audio Settings. Use the slider to set audio detection sensitivity for your trigger.
    • Device: Select your action device. This is the camera or device that you want to react to the trigger. For example, you can tell the Arlo Pro 4 in your backyard to start recording when your Arlo Video Doorbell is triggered.
    • Action. Select the action you want your Arlo device to take when triggered by motion or sound.
    • Recording Settings. Specify what you want your device to do when motion or audio is detected.
    • Notification. Choose if you want push notifications, email, or both.
  7. Review the summary of your settings and tap or click Save. Your new mode is saved. You can now select it from the mode menu. Note: Custom modes can be set individually for cameras that are connected directly to Wi-Fi. Cameras connected to an Arlo SmartHub or Base Station can only have a single custom mode active at a time, but may have multiple rules for different cameras within the single mode.
You can use the Arlo app to arm or disarm your Arlo devices one at a time, or simultaneously. Doing this deactivates the mode that your device was previously set to, then moves it into the Armed or Disarmed mode.

To arm or disarm a single Arlo device:
  1. Launch the Arlo app or log in to my.arlo.com.
  2. Tap or click Mode.
  3. Select an Arlo device.
  4. Tap or click the pencil icon next to Armed or Disarmed.
  5. Tap Done.

To arm or disarm all your Arlo devices:
  1. Launch the Arlo app or log in to my.arlo.com.
  2. Tap or click Modes.
  3. Tap or click Arm All Devices or Disarm All Devices. Arlo Devices
    Note: If you have an Arlo Baby camera, Arm All Devices sets the camera to the Monitoring On mode. Disarm All Devices sets the camera to the Monitoring Off mode.

Geofencing, Schedule, and Custom modes do not remain activated when you arm or disarm a device. If you want to return your device to a Geofencing, Schedule, or Custom mode, you must manually select the device and return it to that mode.
You can set a schedule to activate and deactivate cameras automatically. Schedules recur weekly. For example, the schedule for Tuesday repeats every Tuesday as long as the schedule is turned on.

Arlo is preconfigured with the following schedule:
  • Monday through Friday, 8:00 a.m. to 5:00 p.m. All motion sensors are on.
  • All other times. All motion sensors are off.
The following instructions are the same if you’re logged in to your Arlo account using the Android app, iOS app, or web browser.

To set a schedule for a camera:
  1. Launch the Arlo app or log in to your Arlo account at my.arlo.com.
  2. Tap or click Mode.
  3. Select a device.
  4. Tap or click Schedule.
  5. Tap the pencil icon or click > next to Schedule. The Schedule page displays.
  6. Tap or click Add. The Add Schedule page displays.
  7. Set the days and times for your new schedule. Note: To add an overnight schedule such as 8:00 p.m. to 6:00 a.m., you need to add two separate schedules, as shown in the screenshot below. First, add 8:00 p.m. to 11:59 p.m., then add 12:00 a.m. to 6:00 a.m. Arlo Schedules
  8. Tap or click Done. Your new schedule is saved.
Geofencing is a virtual fence that helps to discover when something or someone enters or exits a pre-defined zone. You can use Arlo Geofencing to arm, disarm, or resume schedule modes when your mobile device is In Zone or Out of Zone.

To configure your mobile device for more accurate geofencing:
  1. Enable GPS or location services so that Arlo can locate your device. Location is required.
  2. Wi-Fi is optional but highly preferred.
Note: By default, your Android device enables the overall location service, though you need to grant permission to each app you install. If location services have been turned off for your Android device, you can switch it back on with a few taps.
  1. Start the Settings app and tap Location.
  2. If it’s off, turn on Use location by swiping the button to the right.
Note: If location services have been disabled for your iOS device, you can turn it back on with a few taps.
  1. Start the Settings app, then tap Privacy.
  2. At the top of the page, tap Location Services and, if disabled, turn it on by swiping the button to the right.

To set up geofencing for the first time and set up modes:
Note: As you tap through the Arlo Secure app instructions, the geofencing wizard displays various prompts. Click OK, got it or Don’t show this message again as you move through the steps.
  1. Launch the Arlo Secure app on your device.
  2. Tap Mode > preferred Arlo device > Geofencing. The Arlo Secure app Would Like to Use your Location prompt displays.
  3. Tap OK or Allow. If you are using an Apple device with iOS 13 or newer, you will receive another prompt later, when you are not actively using the app. You will need to tap Change to Always Allow to keep your Geofencing preferences running at all times. Note: Geofencing works only if Arlo can locate your mobile device.
  4. Tap the Address field, type the address location that you want your geofence to center around, and tap Next. The geofence radius displays as Medium.
  5. (Optional) To change your radius setting, tap the radius icon, select a radius size, and tap Next. Radius size options are Small, Medium, or Large (approximately 150 meters, 250 meters and 500 meters, respectively).
  6. Enter a name for your location and tap Next.
  7. Select an Away mode and tap Next. Note: When your mobile device is Out of Zone, the Arlo device defaults to the Away Mode. Most people select Armed or Custom Mode while they are away.
  8. Select a Home mode and tap Next. Note: When your mobile device is In Zone, the Arlo device defaults to Home Mode. Most people select Disarmed or Custom Mode while they are home. If you have more than one enabled mobile device, you might be asked to select an Arlo device to connect it to.
  9. (Optional) Tap the preferred mobile device and tap Next.
  10. Tap Save > Finish. Geofencing has been set up on your Arlo device.
An Activity Zone focuses motion detection on a specific area within your camera’s field of view. When your Arlo camera detects motion, it determines whether the motion occurred within the Activity Zone(s) that you created. If motion is detected within an Activity Zone, the Arlo Secure app notifies you, and the recording is uploaded to your video Library.

How do Activity Zones affect video recording? When motion is detected and Activity Zones are in use, Arlo will check to see if there is activity within the zone. If there is activity in the zone, a notification will be sent (unless filtered out by Smart notification preferences). If Record Video is enabled in Modes and Rules, the video will be saved in the Library. If Record Video is not enabled, then no recording will be saved and you will not receive a notification. If Local Storage is in use, all videos will be saved regardless of whether the activity is in the zone or not.

What you need
If you’re subscribed to an Arlo plan, you can use Activity Zones with the following cameras:
  • Arlo Ultra series
  • Arlo Pro series
  • Arlo Essential series
  • Arlo Go series
  • Legacy cameras (Arlo Wire-Free, Arlo Q, Arlo Q Plus, Arlo Baby)

If you’re not subscribed to an Arlo plan, you can connect the following cameras to continuous AC power to use Activity Zones:
  • Arlo Pro 4
  • Arlo Pro 3
  • Arlo Pro 3 Floodlight Camera
  • Arlo Pro 2
  • Arlo Pro
  • Arlo Q
  • Arlo Q Plus
  • Arlo Baby
Depending on your camera model, you can create up to three or five Activity Zones per camera, with up to four or eight anchor points to determine the size and shape of the zone.

To create Activity Zones:
  1. Launch the Arlo Secure app or log in to my.arlo.com.
  2. Tap or click the settings (gear) icon under that camera that you want to create an Activity Zone for. Note: If you are creating an Activity Zone for a camera that is compatible with Auto Zoom and Tracking, ensure that Auto Zoom and Tracking is turned off. Activity Zones can be impacted when Auto Zoom and Tracking is enabled.
  3. Tap or click Activity Zones.
  4. Tap or click the + icon at the upper-right corner.
    1. To resize the Activity Zone, drag the corners of the zone.
    2. Tap or click and hold within the Activity Zone to reposition it.
    3. To customize the Activity Zone name, tap or click the pencil icon.
  5. Enter a name for the Activity Zone and tap or click Done. Your settings are saved.
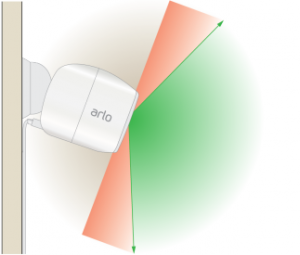
What is the Arlo vehicle detection feature? The Arlo vehicle detection feature detects cars, trucks, buses, motorbikes, and bicycles, and allows you to receive rich notifications when your Arlo camera detects a vehicle. Rich notifications allow you to see alerts from your lock screen that include images of what your camera recorded.

Consider the following factors when using the animal detection feature:
  • Distance. Your Arlo camera can detect vehicles up to 100 feet away, depending on their size. For example, your Arlo camera will have an easier time detecting a truck that’s 100 feet away compared to a small car.
  • Lighting. If a vehicle’s head lights are aiming directly at your Arlo camera, your Arlo camera might not detect the vehicle.
  • View. Your Arlo camera must have a clear view of the vehicle to detect it. If a vehicle is behind a tree or other objects, your Arlo camera might not detect it.
  • Speed. The Arlo vehicle detection feature detects vehicles moving up to 20 miles per hour. If a vehicle is moving faster than 20 mph, your Arlo camera might not detect it.
If your Arlo camera isn’t sure it detected a vehicle, you’ll receive this message: “Arlo thinks it saw a vehicle”. If you would like to help improve Arlo’s algorithm, you can verify that Arlo detected a vehicle in your Library and donate the video footage when prompted by your Arlo app.

What types of vehicles can the Arlo vehicle detection feature detect?
Vehicle refers to a car, truck, bus, motorbike, and bicycle.

What’s the range of the Arlo vehicle detection feature; how close do vehicles have to be to Arlo?
Your Arlo camera can detect vehicles up to 100 feet away, depending on their size. For example, your Arlo camera will have an easier time detecting a truck that’s 100 feet away compared to a small car.

Does the Arlo vehicle detection feature work during the day and at night?
Yes. However, if a vehicle’s head lights are aiming directly at your Arlo camera, your Arlo camera might not detect the vehicle.

What is the Arlo animal detection feature?
The animal detection feature allows you to receive rich notifications when your Arlo camera detects an animal. Rich notifications allow you to see alerts from your lock screen that include images of what your camera recorded. The Arlo animal detection feature detects any animal larger than a small rodent.

Consider the following factors when using the animal detection feature:
  • Distance. The Arlo animal detection feature detects all animals except small rodents within 50 feet of your Arlo camera. If a large animal is too far away, your Arlo camera might register it as a small rodent, and it won’t notify you.
  • Lighting. At night, animals must be within 25 feet of your Arlo camera to be detected.
  • View. Your Arlo camera must have a clear view of an animal to detect it. If an object, such as a tree, is partially blocking the animal, your Arlo camera might not detect it.
If your Arlo camera isn’t sure it detected an animal, you’ll receive this message: “Arlo thinks it saw an animal. If you would like to help improve Arlo’s algorithm, you can verify that Arlo detected an animal in your Library and donate the video footage when prompted by your Arlo app.

What types of animals can the Arlo animal detection feature detect?
The Arlo animal detection feature detects any animal except for insects and small rodents. When an animal is detected, a rich notification alert is sent to your home screen.

Does my Arlo camera need a clear view to detect an animal?
Yes. If an object, such as a tree, is partially blocking the animal your Arlo camera might not detect it.

How close do animals need to be for the Arlo animal detection feature to work?
The Arlo animal detection feature detects all animals except small rodents within 50 feet of your Arlo camera. If a large animal is too far away, your Arlo camera might register it as a small rodent and won’t notify you.

Does the Arlo animal detection feature work during the day and at night?
Yes. Your Arlo camera uses the infrared sensor to detect animals up to 25 feet away.

Does Arlo camera need a clear view to detect a vehicle?
Yes. If a vehicle is partially blocked by an object, your Arlo camera might not detect it.

Does Arlo detect fast moving vehicles?
The Arlo vehicle detection feature works best in driveways and cul-de-sacs. It detects vehicles moving up to 20 miles per hour. If a vehicle is moving faster than 20 mph, your Arlo camera might not detect it.

How does the Arlo person detection feature work?
Using advanced algorithms, your Arlo security cameras alert you when a person is detected and filters out everyday movement, such as tree branches. This feature ensures that you see what’s important and reduces the amount of unwanted alerts. The person detection feature also allows you to search your recording library for videos containing people.
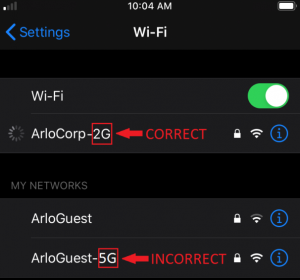
By selecting what notifications, you want to see, Arlo will intelligently give you a more personal and purposeful home security experience. Your Arlo camera will continue to record all videos to your Library, but you will only receive push notifications based on your selections.

Note: E-mail notifications are not affected by the alert selections.
  • People:
    • Allows for Person Detection so you know who is coming and going. Arlo can tell the difference between people and other objects.
  • Vehicles:
    • Allows for Vehicle Detection so you can monitor your driveway or turn it off to ignore vehicles driving up and down your street.
  • Animal:
    • Allows for Animal Detection to keep an eye on your pets or monitor animals that come onto your property.
  • All Other Motion:
    • If All Other Motion is turned off, Arlo will only notify you of the other object types you have selected (People, Vehicles, or Animal).

Tip: Select People and unselect All Other Motion to only be notified when people are detected.

Looking for custom solutions?

Aptitude can help guide and recommend a solution!

Funny Name. Peerless Protection.
Coming Soon!

With Arlo, your privacy is protected in the real world and the digital one, meaning your data is kept safe while you protect your home.

Fill out the form to get more information about how to upgrade your package to include Arlo Security with Aptitude Internet Solutions!

    Aptitude’s digital experts will help you determine which level of service best suits your browsing behavior or business needs.

    learn more >

    Locally-owned and family-operated, Aptitude puts the needs of our customers and community at the center of everything we do.

    learn more >

    We are constantly expanding our service area, bringing affordable, high-speed internet service to more homes and businesses.

    learn more >

    Additional Questions? Contact our team at info@aptitudeinternet.com or 573-755-0555

    Skip to content